Showing posts with label DIY and Decor. Show all posts

Thursday, April 5, 2018

Half Bath Remodel

Another project in the bag! We re-did our downstairs half bathroom. It was a fun project mostly because it was so small. So it went by quickly and it was easy to do. We were also able to try some new things we have been itching to do.


Then nice thing about this bathroom before is that it was very plain, so there wasn't much prep work. I started by ripping off the baseboard and casing. I then had to have Jeremy's assistance taking down the mirror. It was literally glued on to the wall! With like cement (exaggeration) or something because that sucker was on there tight! Next, was filling all the holes.


I decided to paint it the same color grey we have in the sitting room and family room, just so it all flows. First we added in the new base and case. We then had some left over wallpaper from our bedroom (blog post coming soon) and decided to use it on one wall of the bathroom. We got it from Amazon, click here if you want to see the exact one. It's super easy to put up! 


Next I had Jeremy make me these shelves and I am in love with them! I love the farmhousey/industrial look they give. If that's even a real thing. I got most of my decorations from Hobby Lobby using their ongoing 40% off coupon. I can't remember where I got the Selenite towers. Either Etsy or Amazon (my bread and butter.)


Probably the most expensive thing was the new light fixture. But I love it so much! I've never even thought about replacing light fixtures until recently. In fact, I don't even notice them for the most part unless they are unique. I did have to buy the Edison light bulbs separately. The one downer about this light fixture is it's not super bright. Of course it's bright enough to see what you are doing but when it comes to cleaning this bathroom I always feel like I can't see as well because it's quite a bit dimmer than the previous light fixture. 


I replaced the oval mirror with this little rectangle guy. I'm not sure it's my favorite and it's super cheap, but it will do for now. Also, check me out in my awesome robe! It's also really hard to photograph this tiny bathroom, I did my best! Haha!


We are getting closer to being done with our master bedroom and I can't wait to show you guys! 

Monday, September 18, 2017

Baby Tippetts Nursery!

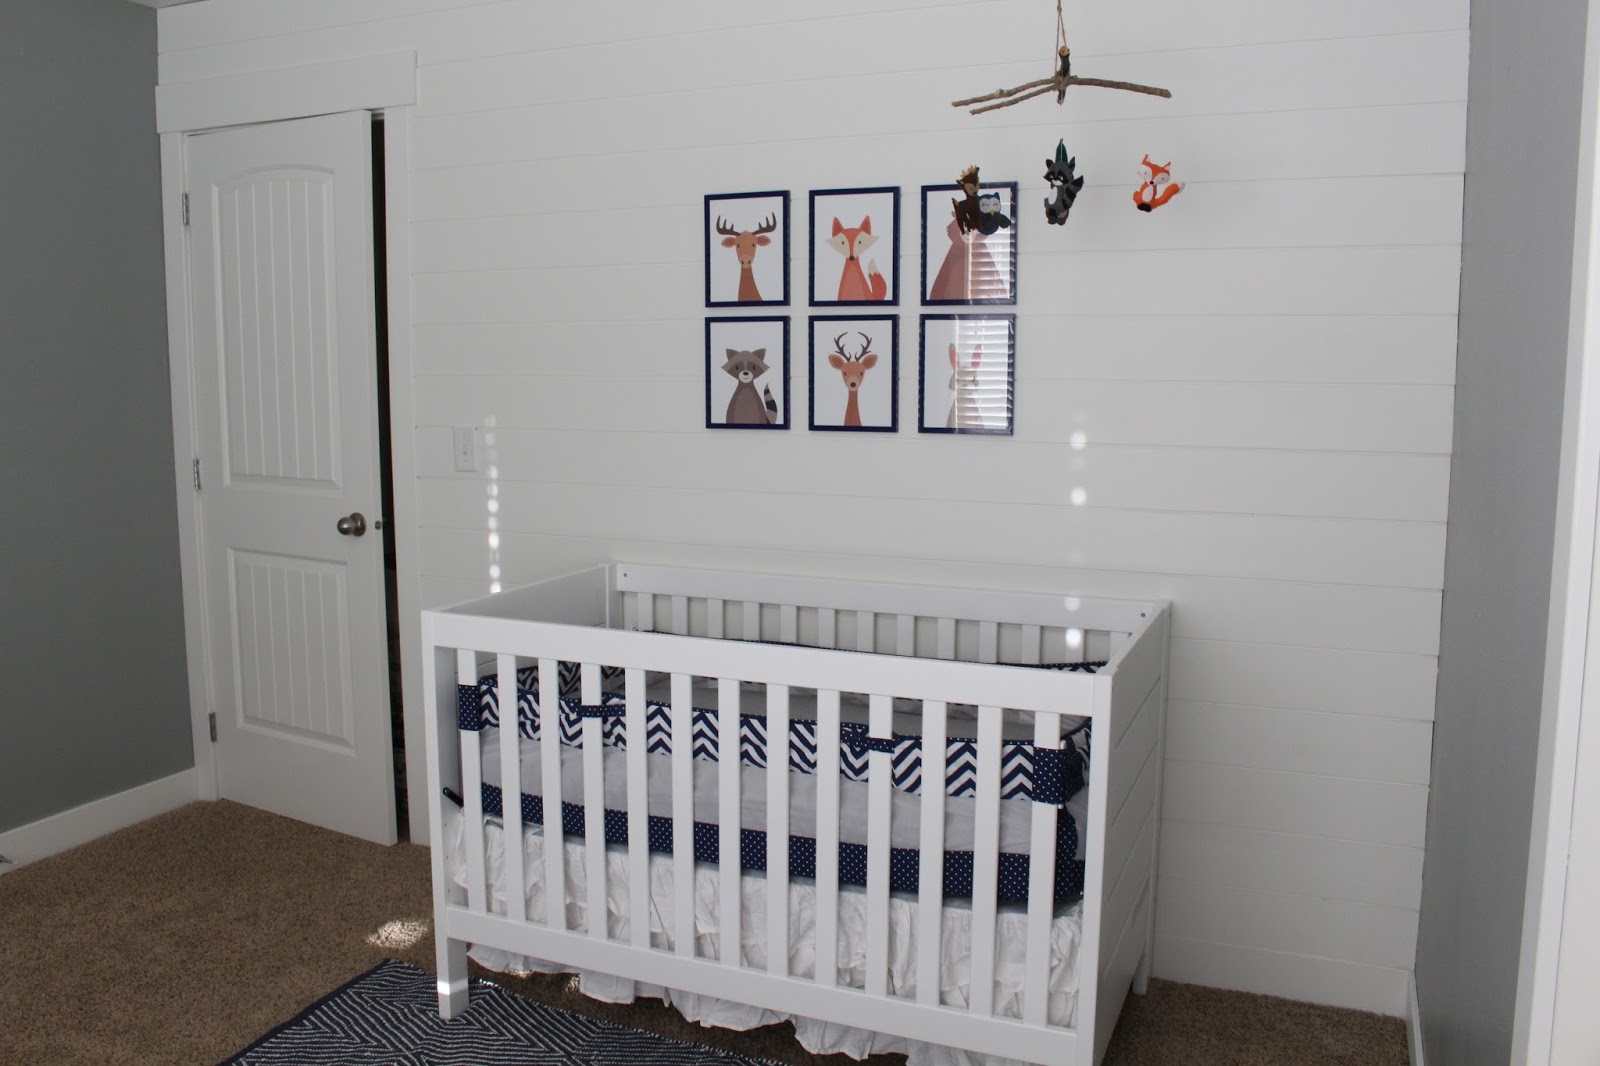
Well, we set off on another project! This time it was conquering the baby's room. Let me tell you, I had a hard time deciding on a "theme." I feel like I got sucked in way too far to Pinterest and I was actually stressing that the baby's room wouldn't be "cute enough." You know, like those nursery's you see where they build a freaking castle crib or something like that. Uh, reality check, baby won't even care! Haha! Anyway, I went back and forth between the idea of forest creatures or planes, trains, and automobiles. As you can see, the forest creatures won out.

I wanted this room to be neutral enough that I could change out the decor easily and without having to change the wall color or anything like that. So I chose a grey and a white. Original, huh? They are both Valspar paint. The grey is Builder Block and the white is Soft Wool.

Well, on to the before and afters!

It was pretty easy to prep this room. We just had to get everything out of it, then patch a few holes. We then ripped off all the baseboard and casing around the doors.


The first thing we did was paint the walls. We are becoming pro painters by now.  Let me tell you, there are few things that are as good to my soul as a fresh coat of paint. We then went to add the new base and case to the room. Jeremy informed me this type of casing is in the style "Craftsmans." When we start out on projects, I find this makes the biggest difference in making our house feel a little bit more custom. I really like this grey. It has a slightly blue undertone which obvs works well with the room.


Next we added a shiplap wall! This was definitely Jeremy's pride and joy. He was excited to get this up. I really wish I would have taken pictures of this process. After he was done shiplapping, we went back and painted it white. He wanted to spray it with his air compressor thing, but I had sudden nightmarish visions of white paint being sprayed on my freshly painted grey walls. So we ended up rolling it. (Thank goodness!)

Next came my adorable forest creature prints! I got them off Etsy for a total of $25 dollars I believe. It was just a digital download. I then ordered the blue frames off of Amazon. This saved me close to $50 dollars had I ordered them printed and framed. You should have seen the punched-in-the-gut face Jeremy gave me when I told him I wanted to hang these on his precious ship lap wall. I thought I was actually going to lose that battle. Turns out, the nail fits every so perfectly in the seams of the boards so when we remove them you won't even be able to see the holes! So up the forest animals went! 


Next is my pride and joy, my homemade mobile! Guys, did you know that buying pre-made mobile cost upwards of $60 dollars? Yeah pretty crazy. So again I turned to my on-again off-again friend Etsy and found a pattern for this sucker. Turns out you actually don't really need a pattern. You could create one easily yourself. Lesson learned. I made this mobile out of felt, cross-stitch thread, and stuffing. Gus and I also foraged for good sticks to hang the animals from. Also, how do you like my MaCGyver-ed hanger from the ceiling? That's a command hook and the sticky part of the command hook. It hasn't fallen yet, so I'm sure it's safe and secure...Anyway, this ended up costing about $30. 

I got this print on sale during Christmas. I love it! I think it works perfectly in this little space. It also has a lot of blue! So win-win.

Did you know Walmart sells rugs from Overstock? Yeah, me either. I got this rug from Walmart online, which was being distributed by Overstock. Go big corporations! I love the pattern and the texture of the rug. I think it fits in perfectly. 


I then got this bumper set and changing table from a neighbor that was selling them. $30 bucks yo! I LOVE the bumper pads. Especially because they have this mesh lining that goes around the crib bars, which calms my over-anxious, first time mom heart. The navy is super great too. The changing table use to be wood colored. Like actual wood. I guess it is still actual wood but now painted white. Don't zoom in on that baby because my paint job is less than superb. 

This cute glider was a gift from my older brother. Shout out to Trevor! I love this thing. Sometimes I just come in this room and sit in the rocker for awhile and absorb the quiet. I think of the times when there will be a precious little babe in the room to take care of. I think it's mentally prepping me. It's extremely comfortable as well. I do want to add two book shelves above the rocker on that wall. All in due time. 


Well I believe that's it folks! Lil Pipsqueak is a mere 5 weeks away (fingers crossed, if I don't go over.) People always ask me if I'm nervous. I don't think I am. I'm definitely more excited. I've had a fairly easy pregnancy and I'm grateful everyday for that. I am running out of room in my belly for the little guy, and he really great at aiming at the same spot of my rib cage over and over, but it's alright with me!


Thanks for reading guys! 


Sunday, February 7, 2016

DIY Envelope Pillow

Hey howdy hey!

So now that our main construction is done for our two rooms downstairs, I have decided it is time to decorate. Which is a double edged sword. Pinterest makes it look so easy, real life makes it way harder. I'm new to the whole decorating stuff, so I'm sure I'm going to change my mind many times. I did find a place to start, recovering my throw pillows on the sectional. The old ones didn't match whatsoever. I have made quite a few envelope pillow covers. I learned out to do it from this tutorial on youtube...


I can now make one start to finish in about 15 minutes. They are really easy! This would be great for a beginner sewer (hopefully you read that in the right context) as well because it doesn't deal with any zippers. Then you can jazz it up by adding ties, or ruffles.

Anyway, I started these pillows last night and just cruised through them. Here are the before.

Oh hey finger. 


As you can see, the long pillows already look worn. Even though I keep telling Jeremy to PLEASE not lay on them while he watches TV....

And here are the after


I tried to make sure I kept it simple (K.I.S.S). I'm usually one to through ruffles, fabric flowers, etc, on everything. Then I get too overwhelmed and end up disliking it. I tried to choose big print patterns and little print patterns to balance out all the miss matched fabrics. Who knows, I may end up not liking it. But for now I do.


The only thing I'm a little "eh" about right now is the grey pillows on the brown couch. It looks better if you look at it standing from the kitchen, because you can see the brown of the palette wall. I would prefer a dark grey sectional. But, you can't have your cake and eat it too (is that saying even applicable right now?)

I was able to cover 7 pillows for about $30. Not bad if I say so myself! Now off to the next project, that will more than likely involve succulents...

Sunday, January 24, 2016

DIY Picture Frames

So, I am someone who loves deals. I get it from my mom. I will not buy clothes unless they are on sale or I have a coupon. I find coupons for almost everything in fact. Hence, these picture frames. I actually got this idea from a Relief Society activity I went to in the fall. It was all about re-purposing items and making things yourself.  There was a lady there in charge of one of the stations who was a spray painting queen. She would go and find really cheap things, spray paint them and BAM! They looked terrific. 

I really wanted some unique frames. Problem, unique frames are expensive. Now your idea of expensive and my idea may be different, but that's ok. So I found myself at the lovely DI again. I went to go look for some frames. In my head I kept telling myself too look for shapes or patterns that really interested me. Don't worry about the color. Imagine the finished product. You get the idea. So I was able to find two frames that I liked. They came to a grand total of $1.25! Wow what a deal! 

I then went to Wal-Mart and picked up some spray paint. I got this spray paint that has a pebbily effect. That's the best way I can describe it.  Anyway, these are the frames before....


The frame on the left looks almost the same in the after picture. I think that's due to the lighting. It really is a different color now. 

The frame on the right ended up being sealed on the back. Apparently that piece of artwork was meant to stay in that sucker. Well, nothing a knife can't fix...

Wa-la!


After the surgery, I took out the artwork that was in there and chucked it. I was then ready to paint. I will throw in a picture of the spray paint I used when I get a picture of it. It did take two coats. I would have primed them too, but I can't find my primer anywhere! Gah! 

Anyway, here are the finished results!
This is the one that was originally on the right. (Am I too obsessed with my dog?)
This was the frame on the left. (They one that didn't require surgery)

Anyway, I think they turned out great! They are just the right amount of fancy. I also saved money. Double bonus. 

Thanks for reading my blog. I appreciate it! 

Saturday, January 23, 2016

Family Room Remodel

Can I just say, eeeeEEEEeeeeeEEEee!!! That is me squealing like a little school girl because of how excited I am about this! We have finally finished our remodel on our family room. This was quite the project. We did everything ourselves, from the painting, to the baseboard, to the pallet walls, and Jeremy built the mantel (I'll go into more detail on that one.) It has been a fun and stressful process. Stressful mainly because it was driving me crazy to have my house so out of order and messy.

Here is the before picture. The room started out a medium brown color. Notice the fireplace, all plain. The dividing wall just a plain white. Also, I took these photos during Christmas, hence the decor....


Then, after!!!

Oh my goodness you guys, I am in love with it! It feels so much cozier and homey. So so nice! I still need to find decorations for my mantel and the TV stand. I also think we will end up moving that blanket chest (which Jer also made) upstairs and getting something that matches a bit better to replace it. I am also going to recover the throw pillows (which I'll probably blog about.)

I would also like to brag about my husband for a second. I had found a mantel that I loved on Pinterest. Jeremy said to send him the picture and he would make it. Umm yeah, look at the photos below.

This is the Pinterest photo I sent him.

And this is his recreation! 

Can you say perfection? I am so lucky to have a husband that knows how to build things, and build them well! The remodel definitely wouldn't have been possible without him. He spent so much time to make it look just how I wanted it. Love him. 

I am just so happy to have a space that feels like us. Now, onto the next project! 


Tuesday, January 12, 2016

DIY Succulent Planter

So I have had an obsession with potted plants. Namely cacti and succulents because they are really hard to kill. Or at least I've heard. Time will definitely tell with this one. Anyway this is totally not my own original idea. I watch a lady on youtube named Christine Kobzeff. She is like this total zen, vegan lady. I love her channel, mainly because she lives very differently from how I live and I like learning about it. She also has like 10 million plants. Of these, she has succulents. Therefore, creating my inspiration.


I love the look of white ceramic. Bad news, white ceramic pots tend to become expensive very quickly. So off to the DI I went. I found this nice red pot with the shape I wanted. I think it was only a dollar. I then went to Wal-Mart and bought some primer and spray paint. I used a white gloss spray paint for the top coat.


This pot came with no drainage holes. This is very important for pots to have. So while my husband was at work, I used his drill and what I thought were drill bits made for pots. I was able to make it through the pots. Although it turns out, those drill bits were actually for wood and not ceramic. Woops. Looks like a nice birthday present of bits is coming Jeremy's way. So moral of the story, make sure you are using masonry drill bits when taking on ceramic.


Anyway, once I was done drilling the holes, I spray painted and waited a day for it to dry. I then took a piece of paper towel and put it on the bottom of the pot. This will act as a barrier for any soil that tries to escape. You could also use a piece of screen. The first layer I put down as about and inch of aquarium gravel. This will aid with quick drainage. Then I put down my cactus soil. Don't use regular potting soil because it doesn't dry quickly enough. Desert plants, fast drying soil. 


Then I planted my adorable succulents. I ordered mine off Etsy. The seller is RanchoGraciasNursery or something like that. If you just type in succulents there will be tons to choose from. Many sellers sell in bulk for wedding favors. You can get a group of 15 for a discounted deal. I didn't need that many so I just bought mine separately. I then added a top dressing. It's aquarium gravel from Wal-Mart, but it looks oh so nice. It gives it that final put together touch (personal opinion.)


I plan on creating more gardens in the summer when I can get the succulents locally.


Sunday, January 10, 2016

Sitting Room Remodel

Welcome to the blog! This is my first official post. Woot woot! So let just get right in to it!

Jer and I gave ourselves the project of redoing our downstairs. We really didn't like how stark white the walls were in the sitting room. The paint job was patchy and it just didn't look good.
At one point,I even had my friend Megan come over and help me paint it a tannish weirdish color. After painting it that color Jer and I decided on whole new decor. Welcome to our gray, rustic, white rooms. The rustic is more in the family room. I'll do a post on that when it's completely done.
We are now done with the sitting room. Hallelujah! This process included ripping off base (by yours truly), ripping off case (Jer did that), then we painted it gray (thanks dad for helping!), put on new base and case (which we had to paint), installed wainscoting, filled in countless holes and sanded. Then painted everything. I even got to use the nail gun. Sounds like a short list when you put it that way, but it did take some time. I also feel very handy-manish. I will post some photos below. I wish I had better before pictures! Oh well.


This is the color Meg and I had painted it the first time.


Let the gray walls commence! Tabby Cat gray to be exact. 

Wainscoting up and ready to be painted!

Look how beautiful! All painted and cleaned up (finally!)

Furniture in place. And check out that rug Jer picked out all by himself! 
Oh boy can I just tell you how much homier if feels? It's so nice to add your own personal touch to your home. I still would like to add a coffee table and an end table in between the chairs. Along with some throw pillows and something on the wall. But I LOVE it so far. I can't wait to show you guys the family room. Wahoo! Also,big shout out to handyman Balone (Jer.) We were able so save so much money on this project due to his exceptional carpentry skills. Go husband who know how to do stuff!